
What exactly is an isolated malware analysis lab?
An isolated malware analysis lab is a set of virtual machines with no network route to your workstation, your local network, or the internet, in which you can execute malicious code and watch what it does. What defines the lab is not the hypervisor or the tooling you install — it is the network topology. If the sample can reach anything you care about, you don't have a lab, you have an incident.
This guide builds that lab end to end with VirtualBox, explains why three of the four network modes any hypervisor offers will not do, and devotes an entire section to the part almost no tutorial includes: proving the isolation actually works before you go anywhere near a real sample.
This guide assumes you are already familiar with installing an operating system in a virtual machine. Everything else is spelled out. The examples use VirtualBox because it is free and cross-platform; in VMware the concepts are identical and only the names change (what VirtualBox calls an internal network, VMware calls a LAN segment).
What are you actually protecting yourself from?
"Isolate the malware" sounds obvious until you ask from what. It is worth looking at each one individually, because each risk is mitigated by a different design decision and it is easy to address only part of the problem:
| Risk | How it plays out | What prevents it |
|---|---|---|
| Spread to your local network | The sample scans the segment and moves laterally over SMB, RDP, or reused credentials | A network with no route to your LAN |
| Encryption of your own data | Ransomware walks mapped drives and host shared folders | No shared folders, no network drives |
| Leaking your IP address | The sample contacts its C2 and the operator sees where it is being analysed from | No real egress; the internet is simulated locally |
| Hypervisor escape | Host-guest integrations (clipboard, drag-and-drop, shared folders) are abused | Disable every integration you don't need |
| Cross-contamination between samples | Leftovers from a previous analysis change what you observe in the next | Restore a clean snapshot between samples |
The third risk is probably the most underestimated. Detonating a sample with real internet access does not just expose you — it tips off the operator, who can pull the infrastructure down before you finish documenting it. In serious analysis you cut egress not only for safety, but for method.
Which network mode really isolates, and which only looks like it does?
This is where most home labs fall down. Every hypervisor offers four network modes and only one is fit for detonating malware:
| Mode | Reaches internet? | Reaches your LAN? | Reaches the host? | Usable? |
|---|---|---|---|---|
| Bridged | Yes | Yes | Yes | Absolutely not |
| NAT | Yes | Via the host | Not directly | No |
| Host-only | No | No | Yes | No, not on its own |
| Internal network (intnet) | No | No | No | Yes |
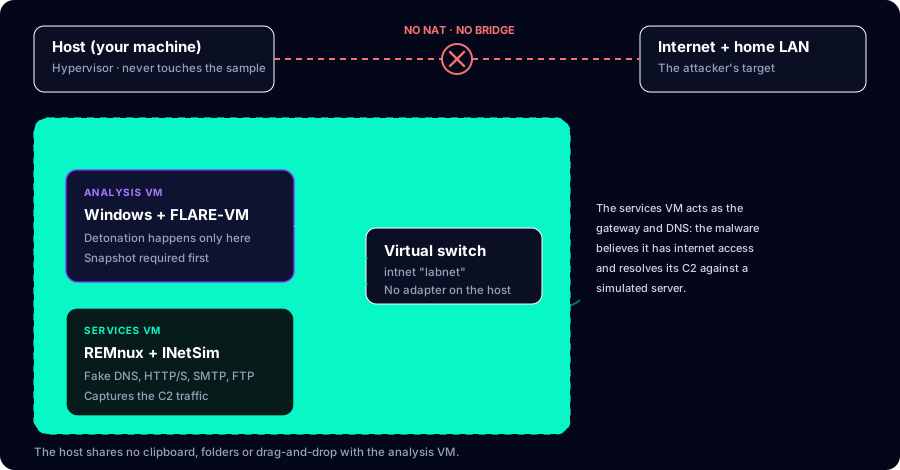
The correct mode is the internal network: a virtual switch living purely in hypervisor memory, with no adapter on the host at all. Machines attached to it see each other and nothing else. The trade-off is that you also lose legitimate access (you cannot copy tools over the network), which is why the lab needs a second machine to act as a fake internet.
How do you build the lab, step by step?
Two virtual machines: an analysis VM (Windows, where most malware you will encounter runs) and a services VM (Linux, simulating the internet and capturing traffic).
1. The services machine
Use REMnux, an Ubuntu-based distribution maintained by Lenny Zeltser built for exactly this. It ships INetSim, FakeNet-NG, Wireshark and the rest of the toolkit already installed and configured, which saves you an entire afternoon.
2. The analysis machine
A clean Windows 10 or 11, with FLARE-VM on top — Mandiant's installer that installs a complete reverse engineering toolkit. Install it while the network is still on NAT, because it needs to download packages; the moment it finishes, egress is cut and never reopened.
3. Cut egress and join both machines
With both VMs powered off, move them onto the same internal network. The name (labnet) is arbitrary, but it has to match: that string is what acts as the switch.
# Both VMs powered off before touching anything
VBoxManage modifyvm "Analysis-Win10" --nic1 intnet --intnet1 "labnet"
VBoxManage modifyvm "Services-REMnux" --nic1 intnet --intnet1 "labnet"

# No bridges back to the host: clipboard and drag-and-drop off
VBoxManage modifyvm "Analysis-Win10" --clipboard-mode disabled
VBoxManage modifyvm "Analysis-Win10" --draganddrop disabled4. Static addressing
There is no DHCP server on an internal network, so addresses are set by hand. A layout that works well:
| Machine | IP address | Gateway | DNS |
|---|---|---|---|
| Services (REMnux) | 10.13.37.2/24 | — (none) | — (it is the server) |
| Analysis (Windows) | 10.13.37.10/24 | 10.13.37.2 | 10.13.37.2 |
Note that the analysis machine is configured to use the services machine as both its gateway and DNS server. That is the key: everything the malware tries to resolve or contact ends up at INetSim.
5. Snapshots before anything else
The snapshot is not a convenience, it is part of the method: without it you cannot repeat an analysis under identical conditions, nor guarantee that what you are observing came from this sample and not the previous one.
# Clean state, tooling installed, network already isolated
VBoxManage snapshot "Analysis-Win10" take "clean-baseline" \
  --description "Win10 + FLARE-VM, intnet, no samples"

# And to return to it between samples
VBoxManage snapshot "Analysis-Win10" restore "clean-baseline"
How do you simulate the internet without real egress?
A sample with no network does very little. If it cannot resolve its command-and-control domain, many families abort execution and you never see the interesting phase. The answer is to hand it a fake internet that answers everything.
INetSim stands up simulated DNS, HTTP, HTTPS, SMTP, FTP and IRC servers. Its value is the wildcard DNS: any domain the sample asks for resolves to the services machine, and any request gets a plausible response.
# /etc/inetsim/inetsim.conf — the lines that matter

# Listen on the lab interface, not on localhost
service_bind_address    10.13.37.2

# Every domain queried resolves here
dns_default_ip          10.13.37.2

# Answer for any domain, not just a fixed list
dns_default_hostname    www
dns_default_domainname  local
The alternative is FakeNet-NG, which runs inside the analysis machine and intercepts traffic before it reaches the network adapter. It is more convenient for quick single-box triage; INetSim is better when you want clean traffic captured on a separate machine, which is the standard approach once you are documenting an analysis.
How do you verify the isolation actually holds?
This is the section missing from nearly every guide, and the only one standing between you and infecting yourself. Do it before you go near any real sample, with the analysis machine still clean.
- 1From the analysis machine, run
ping 10.13.37.2. It must reply: if it doesn't, the virtual switch is misconfigured and you will see no traffic. - 2Run
ping 8.8.8.8. It must fail. If it replies, you have real egress and the lab is not isolated. - 3Try resolving any domain with
nslookup does-not-exist.test. It should return 10.13.37.2, confirming wildcard DNS works. - 4Point a browser at any URL. You should get the INetSim page — not a network error, and certainly not the real site.
- 5From your host, run
VBoxManage list hostonlyifs. The lab network must not appear: an internal network creates no host adapter, and that absence is precisely the proof. - 6Try to reach your home router from the analysis machine (
ping 192.168.1.1or whatever yours is). It must fail.
| Check | Correct result | If you get anything else |
|---|---|---|
ping the services VM | Replies | Check both VMs use the same internal network name |
ping 8.8.8.8 | Always fails | A NAT or bridged adapter is still attached — remove it |
| DNS resolution | Returns the services IP | INetSim isn't listening, or the guest DNS doesn't point at it |
ping your home router | Always fails | Isolation is broken — do not continue |
What does malware do to detect it is running in a virtual machine?
Many families check whether they are being analysed and, if they detect it, sit still or exit. In the MITRE ATT&CK matrix this is technique T1497 (Virtualization/Sandbox Evasion). What they typically look at:
| Signal | Where it looks | Can you hide it? |
|---|---|---|
| Hypervisor registry keys | HKLM\\SOFTWARE\\Oracle\\VirtualBox Guest Additions, HKLM\\HARDWARE\\ACPI\\DSDT\\VBOX__ | Yes, by renaming keys |
| Guest processes | VBoxService.exe, VBoxTray.exe, vmtoolsd.exe | Yes, by not installing guest additions |
| Vendor MAC prefix | 08:00:27 on VirtualBox, 00:0C:29 and 00:50:56 on VMware | Yes, by setting an arbitrary MAC |
| Hypervisor bit in CPUID | Leaf 1, bit 31 of the ECX register | Not easily |
| Scarce resources | Fewer than 2 cores, less than 4 GB RAM, tiny disk | Yes, by assigning realistic resources |
| No human traces | No browsing history, no recent documents, motionless mouse | Yes, by "living in" the machine a little |
In practice, for most work you don't need to harden anything. If you are triaging a suspicious email or a commodity binary, the sample will just run. Hardening costs time and pays off when you are chasing targeted families that do implement these checks. Start with a working lab and harden when you hit a sample that refuses to run.
And mind the trade-off: removing guest additions costs you convenience (no shared clipboard, fixed resolution) but also shrinks the hypervisor escape surface, so in this particular case convenience and safety point in opposite directions. For this reason, Guest Additions are best left uninstalled unless they are strictly required.
How do you handle samples without infecting yourself by accident?
The lab can be perfect and you can still infect your workstation by mishandling the file before it gets inside. Handling discipline matters as much as topology.
- 1Always download samples inside an encrypted container. The industry convention, used by repositories such as MalwareBazaar, is a ZIP with the password
infected. - 2Never extract on the host. The file moves into the analysis machine still compressed — via an attached virtual disk, or a read-only share unmounted afterwards, never a permanent shared folder.
- 3Hash it before touching anything, so you can reference the sample unambiguously:
sha256sum sample.zipon Linux, orGet-FileHash -Algorithm SHA256 sample.zipin PowerShell. - 4Change the extension while moving it (
.exeto.exe_, or drop it entirely). It prevents the classic accidental double-click. - 5Disable antivirus only inside the analysis machine. If Defender is live it will delete the sample mid-analysis and you will lose the work.
- 6When you finish, restore the clean snapshot. Don't delete the file and carry on — restore.
The mistakes that keep coming back
- Mistaking host-only for isolation. This is failure number one and it leaves your own machine reachable by the sample.
- Leaving a second adapter on NAT "just to copy things across". One is enough for isolation to not exist.
- Restoring an old snapshot taken before the network was isolated, which silently reverts the network configuration too.
- Analysing without capturing traffic. If Wireshark wasn't recording, half the behaviour is gone and you get to start over.
- Reusing the machine between samples without restoring. You end up attributing to one sample the persistence left behind by another.
- Permanent shared folders. The most direct route for ransomware in the VM to encrypt files on the host.
A properly isolated lab is the foundation of any reliable malware analysis process. Without a reproducible, controlled environment the conclusions you draw stop being verifiable, and the risk grows for both the analyst and the surrounding infrastructure. The methodology described in this guide is a solid starting point on which to build more advanced analysis procedures.
The next step is applying a complete analysis method — static triage, decompilation, dynamic and network analysis through to a detection rule — which is the route covered by the Windows Malware path. You can see it applied end to end in the step-by-step AgentTesla analysis.